If you've found this website helpful, please click the Donate button. Thanks for the support.
Find this page useful and think a friend might too? Share it!
Find this page useful and think a friend might too? Share it!
1. Pushes on Swiss Ball
Starting Position:
• Begin by laying on your side on a mat.
• Place the swiss ball in front and lower than hip level.
• Place top leg on top of swiss ball.
• You leg should be about 0-90 degrees from the side lying position.
• Use top arm for support as you place your hand in front of you on
mat.
Downward Phase:
• Slowly press leg down into ball as far as you can.
• Hold position when you cannot press any further.
• Only a slight bend in the knee should be present.
• Do not roll forward with the trunk, shoulders, or head.
• Maintain a straight line with the trunk and neck.
• Other leg not involved should be straight and in line with your body.
Upward Phase:
• Slowly allow your leg to come up from the pressed down position.
• Do not allow leg to bounce up.
• Other leg not involved should be straight and in line with your body.
• Repeat until desired repetition range is met.
• Flip to your other side and repeat exercise on that leg.
Tips:
• Try using different sized swiss balls.
• If you find that you can’t squeeze as hard, try using a smaller swiss
ball.
2. Hip Adduction Machine
Starting Position:
• Adjust seat width so that you feel a slight stretch on your adductor
muscles when your inner thighs are placed on the pads.
• Sit tall with proper posture.
• Knees should be bent at approximately 90 degrees or more.
• Place feet on foot level or platform.
Upward Phase:
• Slowly squeeze your thighs together.
• Keep feet straight and pointed forward.
• Keep knees over feet.
• Hold Squeeze a few seconds at the end of movement.
Downward Phase:
• Slowly release your squeeze.
• Stop just short of the starting position.
• Repeat until desired repetitions are met.
• Don’t allow weight to slam back to starting position.
3. Ball Squeezes
Note:
Do not use a ball that you think might easily pop or deflate! This exercise is best used with inflatable balls meant for exercise although other balls such as soccer balls can be used.
Starting Position:
• Begin by getting a small ball such as a soccer ball or basketball.
• Use a ball that will “give” and is not too stiff.
• Lay on your back with your knees bent at 90 degrees.
• Feet should be flat on the floor and pointed forward.
• Feet should be parallel and touching.
• Place ball in between knees.
• This is the starting position.
Upward Phase:
• Squeeze ball slowly as you bring knees together.
• Keep feet flat on the ground and do not roll up on your toes or lift
your heel.
4. Hip Adduction with Cable Machine
Starting Position:
• Set cable pulley on tower at lowest level toward floor.
• Begin by placing an ankle or foot strap onto the cable pulley.
• Place the nearest leg (to cable tower) in the strap.
• Strapped leg should be closest to the tower.
• Grip tower with the same side arm or another stable object with
opposite side arm.
• Stand tall and straight up.
Upward Phase:
• Begin by raising the strapped leg sideways without bending at the
trunk.
• Do not bend at the knees at all throughout movement (slight bend is
ok).
• Keep head and trunk straight up throughout.
• Tendency will be to bend trunk to opposite side of leg being lifted.
• Keep toe point straight throughout.
• Stable leg should also be pointed and kept forward.
• Movement is complete once you cannot raise leg sideways any
higher.
Downward Phase:
• Slowly control the weight being lowered.
• Stop just shy of the starting position and repeat desired repetitions.
• Do not bend at knee.
• Keep trunk and neck upright and in line.
Tips:
• If weighted leg crosses in front of other leg in the starting position
this is ok.
• Try pointing your toe inwards slightly if you cannot feel the
contraction on the side of your hip.
• Also try raising leg slightly backwards to engage more hip activity.
5. Side Leg Lifts
Starting Position:
• Begin by laying on your side on a mat.
• Align your body in a straight line.
• Take top leg and externally rotate it outward with the knee bent at
approximately 90 degrees and foot flat on the mat.
• This will be the stabilization leg.
• The bottom leg should remain in line with the body and straight.
• You may support your head by bending your bottom arm and using
the palm to cradle your head.
Upward Phase:
• Slowly raise your bottom straight leg up from the resting position.
• Be sure to not let the leg sway forward or backward.
• You should feel tension in the inside of your thigh.
• Don’t bend at the knee.
• Stabilization leg should not move throughout.
• Movement is complete when you cannot raise your leg anymore.
Downward Phase:
• Slowly lower your leg down the same way it was raised.
• Stabilization leg should not move throughout.
• Stop just shy of touching the mat.
• Repeat the desired amount of repetitions on that leg.
• Roll over to the other side and repeat with other leg.
Tips:
• Try adding ankle weights if you feel this exercise is too easy.
• If you feel there is not enough room to raise your bottom leg, try
rotating your hips backwards to open up your legs a little bit more
and taking a wider step with the stabilization leg (top leg).
Starting Position:
• Begin by laying on your side on a mat.
• Place the swiss ball in front and lower than hip level.
• Place top leg on top of swiss ball.
• You leg should be about 0-90 degrees from the side lying position.
• Use top arm for support as you place your hand in front of you on
mat.
Downward Phase:
• Slowly press leg down into ball as far as you can.
• Hold position when you cannot press any further.
• Only a slight bend in the knee should be present.
• Do not roll forward with the trunk, shoulders, or head.
• Maintain a straight line with the trunk and neck.
• Other leg not involved should be straight and in line with your body.
Upward Phase:
• Slowly allow your leg to come up from the pressed down position.
• Do not allow leg to bounce up.
• Other leg not involved should be straight and in line with your body.
• Repeat until desired repetition range is met.
• Flip to your other side and repeat exercise on that leg.
Tips:
• Try using different sized swiss balls.
• If you find that you can’t squeeze as hard, try using a smaller swiss
ball.
2. Hip Adduction Machine
Starting Position:
• Adjust seat width so that you feel a slight stretch on your adductor
muscles when your inner thighs are placed on the pads.
• Sit tall with proper posture.
• Knees should be bent at approximately 90 degrees or more.
• Place feet on foot level or platform.
Upward Phase:
• Slowly squeeze your thighs together.
• Keep feet straight and pointed forward.
• Keep knees over feet.
• Hold Squeeze a few seconds at the end of movement.
Downward Phase:
• Slowly release your squeeze.
• Stop just short of the starting position.
• Repeat until desired repetitions are met.
• Don’t allow weight to slam back to starting position.
3. Ball Squeezes
Note:
Do not use a ball that you think might easily pop or deflate! This exercise is best used with inflatable balls meant for exercise although other balls such as soccer balls can be used.
Starting Position:
• Begin by getting a small ball such as a soccer ball or basketball.
• Use a ball that will “give” and is not too stiff.
• Lay on your back with your knees bent at 90 degrees.
• Feet should be flat on the floor and pointed forward.
• Feet should be parallel and touching.
• Place ball in between knees.
• This is the starting position.
Upward Phase:
• Squeeze ball slowly as you bring knees together.
• Keep feet flat on the ground and do not roll up on your toes or lift
your heel.
4. Hip Adduction with Cable Machine
Starting Position:
• Set cable pulley on tower at lowest level toward floor.
• Begin by placing an ankle or foot strap onto the cable pulley.
• Place the nearest leg (to cable tower) in the strap.
• Strapped leg should be closest to the tower.
• Grip tower with the same side arm or another stable object with
opposite side arm.
• Stand tall and straight up.
Upward Phase:
• Begin by raising the strapped leg sideways without bending at the
trunk.
• Do not bend at the knees at all throughout movement (slight bend is
ok).
• Keep head and trunk straight up throughout.
• Tendency will be to bend trunk to opposite side of leg being lifted.
• Keep toe point straight throughout.
• Stable leg should also be pointed and kept forward.
• Movement is complete once you cannot raise leg sideways any
higher.
Downward Phase:
• Slowly control the weight being lowered.
• Stop just shy of the starting position and repeat desired repetitions.
• Do not bend at knee.
• Keep trunk and neck upright and in line.
Tips:
• If weighted leg crosses in front of other leg in the starting position
this is ok.
• Try pointing your toe inwards slightly if you cannot feel the
contraction on the side of your hip.
• Also try raising leg slightly backwards to engage more hip activity.
5. Side Leg Lifts
Starting Position:
• Begin by laying on your side on a mat.
• Align your body in a straight line.
• Take top leg and externally rotate it outward with the knee bent at
approximately 90 degrees and foot flat on the mat.
• This will be the stabilization leg.
• The bottom leg should remain in line with the body and straight.
• You may support your head by bending your bottom arm and using
the palm to cradle your head.
Upward Phase:
• Slowly raise your bottom straight leg up from the resting position.
• Be sure to not let the leg sway forward or backward.
• You should feel tension in the inside of your thigh.
• Don’t bend at the knee.
• Stabilization leg should not move throughout.
• Movement is complete when you cannot raise your leg anymore.
Downward Phase:
• Slowly lower your leg down the same way it was raised.
• Stabilization leg should not move throughout.
• Stop just shy of touching the mat.
• Repeat the desired amount of repetitions on that leg.
• Roll over to the other side and repeat with other leg.
Tips:
• Try adding ankle weights if you feel this exercise is too easy.
• If you feel there is not enough room to raise your bottom leg, try
rotating your hips backwards to open up your legs a little bit more
and taking a wider step with the stabilization leg (top leg).
Exercise Guide
Like the site? Sign up for the FREE newsletter. I'll send a new article once or twice a month. Unsubscribe
anytime.
anytime.

About this Site l Contact l Free Newsletter l Subscribe to Rss Feed
Recommended Products l Fitness Store l Directly Fitness Blog
Recommended Products l Fitness Store l Directly Fitness Blog
Continue to learn more about how to exercise: Exercises Home
Hip Adductors Exercises:
(In order of appearance)
1. Pushes on Swiss Ball
2. Hip Adduction Machine
3. Ball Squeezes
4. Hip Adduction with Cable
Machine
5. Side Leg Lifts
(In order of appearance)
1. Pushes on Swiss Ball
2. Hip Adduction Machine
3. Ball Squeezes
4. Hip Adduction with Cable
Machine
5. Side Leg Lifts
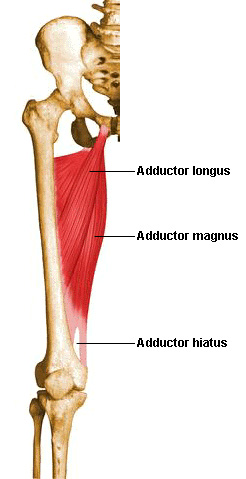
HIP ADDUCTOR EXERCISES


Exercises:
HIP ADDUCTORS
